|
BetterPhoto Member |
Camera Shake (Flinch)? Can anyone help me? Iam 53 years old, have been shooting since high school year book in 1974. I have discovered in the past year or so that when I depress the shutter release that I flinch real bad resulting in camera shake. I shoot with a Nikon D300 and their vibration restisant(VR)lens ,i also notice when I shoot with my SB800 flash my images look a bit better.i notice also the problem accurs even out doors on sunny days at higher shutter speeds, any ideas?
|
||||||||||
|
|
|||||||||||
|
Jessica Jenney |
Patrick, why don't you buy a shutter remote release? That would probably be the best solution.
|
||||||||||
|
|
|||||||||||
|
Mark Feldstein |
Howdy Patrick ! It's less likely that your flinching is related to age as opposed to technique. In that respect, I offer the following: Soft images can be caused by a number of factors either singly or in combination. Subject movement aside, using a long lens whether fixed or a zoomer, say a 200 or even 400 mm lens at less than optimal shutter speeds say 1/250th or 1/500th for those two lenses, can lead to soft images especially at higher magnification/enlargement. Thus, that's one technique to try, higher speeds or even bump your ISO up a bit.
|
||||||||||
|
|
|||||||||||
|
Alan N. Marcus |
Hi Patrick, As always, Mark is spot on. I do however offer one tip that could be helpful.
|
||||||||||
|
|
|||||||||||
|
Bob Cammarata |
Use your timer. Or you can set your shutter to "burst" and fire off multiple frames. The movement of the camera will register on the first and last exposures (when you press and release the shutter). The middle frames will be sharpest. Developing a good shutter release technique is an acquired skill. (I like Alan's mirror trick).
|
||||||||||
|
|
|||||||||||
|
Jeffrey R. Whitmoyer |
Patrick, I'm a few years older than you and have noticed that I'm not as steady as I once was. My solution is to use a tripod more often, coupled with a remote shutter release. Once you are in your fifties the abuses of our younger days start taking a toll, at least in my case, so we have to find ways to compensate for the problems. Of course, thoughts of something more serious than normal wear and tear on the body crop up on particularly bad days, but it's mostly just getting older smacking us around a little. Jeff
|
||||||||||
|
|
|||||||||||
|
John H. Siskin |
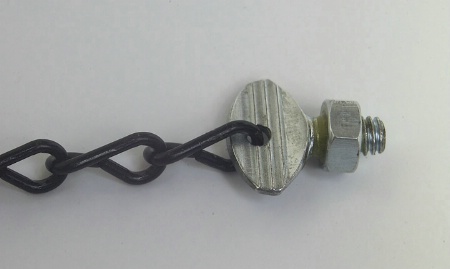
I got out of high school in 1947, so I am facing new issues with my shooting also. The chain-pod and it is a simple lightweight substitute for a monopod. I have successfully taken photos at a 1/15th of a second with this tool. You will need a 1/4 X 20 thumbscrew; you can get this at any hardware store. 1/4 X 20 is the size of the tripod socket in your camera. The threads on the thumbscrew should be about 1/2 inch long. You will also need about 6 feet of chain, more if you are very tall. Drill a hole through the flat part of the thumbscrew and attach the end of the chain into the hole. You may want to glue a nut on the thumbscrew to prevent over tightening the thumbscrew into the camera. You have just made a chain-pod! Now in order to use this, attach it to the tripod socket of your camera, step on the chain, and pull up. The tension you create on the chain serves to stabilize your camera. This project only requires a drill to complete. Another consideration is how you hold the camera. The camera lens should be cradled in the left hand with the index finger and the thumb closest to the front of the lens. The elbow is braced in against the body. This will give you more control and stability than trying to hold the camera with the right hand.
|
||||||||||
|
|
|||||||||||
|
This old forum is now archived. Use improved Forum here
Report this Thread |
|||||||||||